
Have you ever wanted to get started in home tech projects or wanted to manage them better? Today, there are more and more services that run various VMs, self-hosted applications, or even servers, so saving time is always valuable. That is where a home lab with Ansible comes in handy.
Ansible is another tool for the task of systems administration which works by giving instructions to computers, servers, and services. Instead of having to sit in front of each of the machines, entering commands manually, one composes one piece of work that informs them all what to do. Imagine having written a complex recipe that your whole kitchen then implements in that one attempt without having to go through the processes of reiteration.
So, how can you make your own setup more efficient? Alright, let’s dissect it in detail.
Why Automate Your Home Lab?
First of all, let us discuss why there could be a desire to automate something in the first place. Some persons may not immediately recognize the challenges of running a small lab for they may assume that it is not a difficult task to manage. Perhaps it is one or two servers for such functions as plex or pihole among others that will be impacted. If you are adding more systems into the environment, managing the upgradations, security along with making sure that every system is in precise condition increases your burden.
That’s where automation shines. Typically, one file and a few commands are enough to update all the machines, set up new software or bring changes to the entire configuration. It just lessens the time it takes to type the letters down, is very precise and, candidly, entertaining as soon as you learn how it works.
You may be wondering why a home lab with Ansible is preferable to script jobs at this point. Good question.
What Makes Ansible Different?
However, Ansible is declarative, which goes against the shell script profiles. And that means the behaviour is that you specify what the desired outcome should be, not how it is to be achieved. For instance, instead of using “This command is used to install a program”, you order Ansible to use “Ensure that this program is installed.” If it is apparent that it is already present, then it simply goes through it. That is why when it is missing, it installs it in order to ease the process of data retrieval. This is because it helps save time and, at the same time, eliminates wrong information that might be generated by different people.
Also, in relation to its performance, it does not need to download and install its software on the machines that it manages and supervises. I t does this only using the level of security which you may already be using to connect with your servers through ssh. That is why it is very easy to use and there is minimum risk in setting up an account with them.
Let us now take a look at how to start building a home lab with Ansible.
Step-by-Step: Setting Up Ansible
As you can see, there are no considerable difficulties that may prevent you from getting Ansible running. Here’s how to get started:
1. Install Ansible
Mount it on the most powerful computer of the system, which is known as the control node. If you are using a Linux system or a Mac, it is easier to get it through the package manager like apt, yum, or brew. For Linux on Windows, the Windows Subsystem for Linux (WSL) exists.
2. Set Up SSH Access
This is quite evident because, unlike other automation tools such as Chef or Puppet, Ansible relies on SSH to connect to the intended machines. Configure passwordless SSH by using (ssh-keygen) and copying the key to the devices with ssh-copy-id.
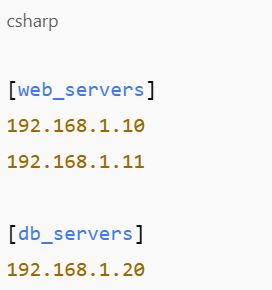
3. Create an Inventory File
This file defines the inventory file to enable Ansible to know the machines to manage. It might look like this:
After the setup, you can now go ahead and run a sample playbook.
Automating Your First Task
Suppose that you are keen on keeping all your devices up to date. Its corollary is that you would write a playbook, which is a YAML file that contains what is expected to occur. Here’s a basic example:

Running this playbook would update every machine in your list in this playbook. One command and you’re done.
This means that it is only the baseline of what is to be expected in the future and probably that is the beauty of innovation. The goals are achieved once you set up your home lab using Ansible, and you can then start automating virtually anything.
Going Further: Reusable Roles
To get a glimpse of how files become large and complex as you automate many tasks, consider the following examples. That’s where roles come in. A role is like a mini-project within your Ansible environment, where most of the main activities are expected to take place. It is also possible to combine separate tasks, variables, and files that are related to each other. For instance, you could have a role that prepares your server as a web server and installs NGINX as your preferred configuration.
There’s no excuse for not having all your setups neat and easily transportable across different machines or distributed to other persons. That is another reason why opting for a home lab with Ansible is a good idea.
What Can You Automate?
This tool is very versatile and can be applied to virtually any material which will be used in experiments in the laboratory.
- Services that should be installed and configured are Docker, NGINX, or Samba.
- Create and manage user accounts.
- Implement the firewall and provide the necessary security rules.
- Deploy and update self-hosted apps.
- Schedule tasks and monitor systems.
It is always worth remembering that every new playbook written is time saved and will spare you from going through the same routine in future.
Is It Worth Learning?
If you want your sup heart and soul into a technology endeavour or even consider it as your career path or just a job, then absolutely. Taking the course that explains how to automate a home lab using Ansible gives practical knowledge in configuration management, infrastructure as a code, and system administration. It simply makes project work more enjoyable as well as a whole much more effective.
Final Thoughts
Juggling may seem like quite a leap towards setting up a home lab with Ansible, but this course is highly accessible to novices. Once you understand the fundamentals, you ask how you survived up to this time without Sensory Stepping.
So now that the preparations are done, are you? Start simple—automate an update. Then, try installing the software. In no time at all, lab management will probably become something you undertake with competence and efficiency.
Are you looking for more home lab ideas or automation tricks? Stay tuned for more blog posts; we’ve got much more up our sleeves.