
Do you desire to manage your own cloud environment from your bedroom or even your garage? For those who like to play with technologies, programming, or development, creating a Kubernetes Cluster in the Home Lab is one of the best ways to understand how applications work in production mode. Trust me —this is not too difficult to understand—we are going to explore it in sections.
Why Set Up Your Own Cluster?
Some might be asking: what need is there for such environment within the home setting? Some of the answer options are: Did you think of all the applications? Can’t your type something online or do you go shopping online now?
Of course, there are currently other cloud services, such as AWS and Google Cloud, which are very effective but costly and quite complex. However, it also provides a good way to learn and gain experience, as any mistake made can safely be corrected in a home lab environment, minus the high costs that accrue with each hour of working in a professional environment.
But in order to bring that image to fruition, think about constructing your own miniature data center. It might be restricted to some extent, but at the same time, you can study whatever you wish.
What You’ll Need to Get Started
We should, however, first discuss gear before we go ahead and install something. It also does not require complex servers or equipment, regardless of the user or the business they are in. Here are a few healthy work settings that could be adopted:
Old Laptops or Desktops: Is there an old computer lying idle somewhere that still works? Perfect. The requirements for malware to run properly are simply a system with at least 4GB of RAM and a reasonable processor.
Raspberry Pi: These are compact and powerful, the small computers which are relatively inexpensive and with low power consumption. It is not rare to see persons assemble several clusters using Raspberry Pis.
Mini PCs or Used Servers: In case of more usage, it can opt for a used server from eBay or a mini PC will be sufficient for that.
Once you have selected your hardware, all the devices should be connected to the same local network. Ethernet cables are the best for connections, though Wi-Fi is suitable for relatively small networks.
Choosing the Right Software
The next step, and perhaps the fun part, is choosing how exactly you want to implement your container platform. It is worth knowing that you do not always have to work with the full and complex version of Kubernetes. There are easier and stripped-down models for the same use.
Some popular choices include:
- MicroK8s: Great for beginners. It is easy to install and very fine to use with Ubuntu.
- K3s: This is a minimal distribution that’s especially recommended for small systems such as Raspberry Pi.
- Minikube: Suitable for a single node scenario where, you do not intend to make much configuration changes on it.
For this purpose, we will be using MicroK8s as it is very easy to install and is suitable for home installation.
Step-by-Step: Setting Up Your Home Environment
Are you planning to put up your own computer cluster? He is going to explain to you how this is possible in 5 easy steps.
Step 1: Install Ubuntu Server
The Ubuntu Server can be downloaded from the project’s official website. You can organize the installation on each of the machines through the use of a USB drive. Select the minimal installation in order to save much space and as less equipment as possible.
Step 2: Set Up Networking
Ensure that home devices can share forms. Before anything else, it is a good idea to assign static IP addresses to the video conferencing systems in case they may cause connection problems in the near future. On the RASPBERRY PIS, it can be done from settings available on the router.
Step 3: Install MicroK8s
Using the terminal on your main device, which will be used as the control plane, the following commands should be input:
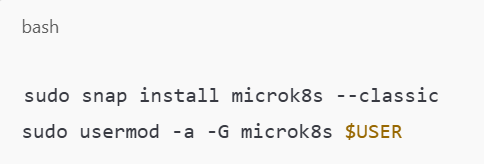
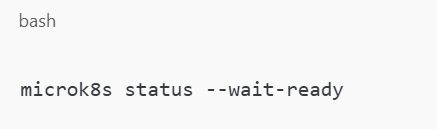
Then log out and back in. Run this to make sure everything is working:
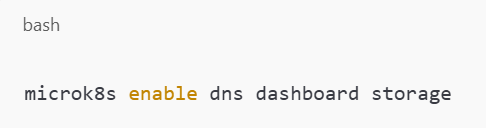
Enable basic services:
Step 4: Add More Nodes
That’s it. If you are using more than one machine, connect them to the cluster. On the main node, run:
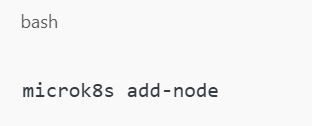
It is instructive to follow the directions which it suggests in order to connect those.
Step 5: Test It Out
Deploy a very basic application such as a calculator to ensure that other deployments will be successful. Try this:
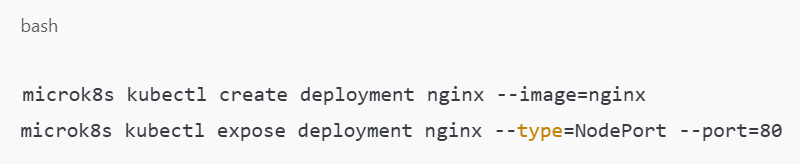
Set that port as exposed and visit the app through your browser. You have just initially developed a brand new web application!
What Can You Do Next?
The next steps will give a brief outlook of what further steps you can do after having your Kubernetes Cluster in a Home Lab set up. You can use it for Grafana monitoring, PostgreSQL and other databases testing, as well as your own websites and app testing.
Want to take it further? Everything seems right, but at its core, a container needs persistent storage to work efficiently and continuously, or an ingress controller to manage the control traffic.
The best part? You are learning through practice, which, as you will find, cannot be acquired from any book or even a video.
Final Thoughts
We should not only recognize the value of a Home Lab Kubernetes Cluster as a fun project but as a way of mastering such technologies. It is more like a preparation for reality, it enhances your curriculum vitae, and is quite flexible overall.
However, understand that you will not require expensive equipment or a long time to do this. It is possible to create something outstanding with a couple or even a handful of such devices and some time on one’s hands.
So what are you waiting for? Swim in, ready, steady go, and welcome to the age of home cloud building. Still, it’s true that the best teacher is experienced, and there is no better classroom than the one in your own home.