
If you are in the process of establishing your home lab and you are in doubt about the best ways to store your files then this is the right time to read this article. You’re not alone. Most people using or testing a server at home ask themselves one very simple question: what’s the most efficient way to store data without having to invest too much effort and money into it?
One popular answer is ZFS. It is relatively complex at first, but don’t worry. We’ll take you through it one by one, though. By the end of this post, you’ll learn how ZFS can be used in the storage system of a home lab and why it is such a popular choice among tech enthusiasts like yourself.
What Is ZFS, and Why Should You Care?
Let’s start simple. ZFS stands for Zettabyte File System. Microsoft Word is a file-organizing software that enables you to store documents and accomplish much more. This system scans your data, corrects any errors just as a spell check in a word book, and allows you to back up your files so that you can undo any changes at any time in case they were not beneficial.
Just imagine that is a digital filing cabinet that does not only store the things, observe them, dust and even duplicate if necessary. That is why as soon as people change their workplace, home lab in particular, for using ZFS for storage, they start liking it.
Planning Before You Begin
However, there are some critical factors that ought to be considered before venturing into the use of this system. First of all – how much space you really require? Are all these for personal use only or is it for Create backups and store videos, and work files among others?
Additionally, it will be helpful to know what sort of hardware you have. ZFS can be used in most systems; however, the more RAM you have on your system, the better your ZFS particular filesystem will run. That is especially the case if you intend to use such capabilities as deduplication or high compression rates.
The next point of consideration will be to look at how the storage needs to be arranged. Are your files copied to another disk for protection’s sake? Or do you keep thinking to use RAID-Z in order to distribute the data across several disks? Living in New York requires this kind of lifestyle and knowing this before you begin makes everything so much smoother.
If you are still pondering whether to use ZFS for storage in a home lab environment, it might be useful to list your storage objectives. It really helps.
Getting It Installed
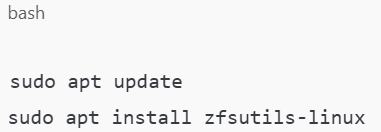
For the sake of these arguments, let’s consider the premise that you are a client of a Linux system, in particular, Ubuntu. It is relatively straightforward to install ZFS there. The way is quite simple: just open the terminal and enter:
Once again, that is, after meeting all these requirements, you are set to go. Other systems, such as FreeBSD and TrueNAS have this particular storage tool already installed as a default. In any case, they are quite simple.
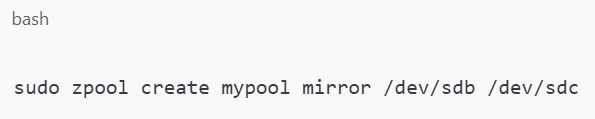
After you set up the actual operating system, you will format your hard drives to create a “pool.” This system writes and stores data through the use of pools as its core components. They consist of videos (virtual devices), and depending on one’s requirements, they can be configured in several forms.
Below is a relatively easy process when it comes to mirroring a pool:
Thus, your journey of learning how to utilize ZFS for storage in a home lab environment begins.
Storing and Managing Your Data
As soon as your pool is created, you can create your datasets. These are similar to folders except that it can be defined with special rules. Sometimes one would wish to confine how much space one dataset can take. Take a look at discussion on how to enable the compression if you want to save space. You can do all of that.
For example:
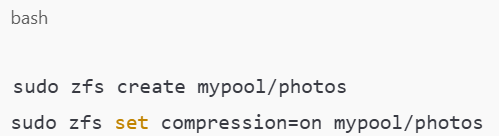
And with that, your photo storage has been optimized to require less space, and this is without any effort on your end.
Snapshots are another awesome feature. It allows you to capture files, applications and data at a given period of time. You can also undo any incident such as erasing a wrong document or accidentally deleting a folder since you have a snapshot of the previous status.
If you wish to take it to the next level of complexity, let’s just tell them they do not matter. Snapshots are writable copies of clones that allow testing out of a piece of software or a particular change with no danger of something going wrong.
All of these tools are some of the reasons why the people continue to look for how to employ ZFS for storage within the home lab environment. All of them are essential for getting a real-life practice when you do not or cannot work in a real classroom.
Keeping Things Running Smoothly
Well, it takes a lot of load with itself, but it is not a bad idea to pay attention occasionally. To check the general status of the zpool use zpool status while to review the dataset and their usage use zfs list.
Backup is always intelligent even with system that guards from various types of data loss. Store the documents on another location that can be an external hard drive or a cloud space for added security. Every system and technology has a flaw and it is good to have a standby in case of some mishaps that may occur.
Wrapping It Up
So, what did we learn today? You now know how to begin with ZFS for storage in a home lab configuration, start it up, and configure it, as well as how to protect your data. This system is perfect for technology lovers and enthusiasts who seek to achieve optimal usage of their storage drives.
ZFS will be worth your while if you are in the habit of backing up your files and want more control how all of this is managed. Regardless of whether customer use it for professional purposes such as running virtual machines or storing multimedia files or as a hobby, it is wise to do so.
Still on the fence? Go ahead and test it out. You will soon realize why mastering the application of ZFS for storage in a home lab environment is one of the best things you can do for your digital platform.