
Did you ever wish to run applications or test projects from your home like an expert? Maybe you’ve heard of Docker but aren’t quite sure where to begin. The good news is that it’s simpler than you think to build your own tech lab at home. Indeed, installing Docker in a home lab can be one of the best ways to learn and test new software tools—all from the comfort of your home office.
So what exactly is Docker, and why should you care? Let’s start there.
What is Docker, Anyway?
Picture your application working perfectly on your system. However, when you attempt to move it to another platform, it fails. That is where Docker steps in. Docker “wraps” apps with whatever they require to execute—code, libraries, and config—so that they will execute the same everywhere.
It’s like placing your app in a neat little box. Where you put that box is where it’s going to do just what you want it to do. This item is a game-changer to anyone who’s interested in computers, particularly when you’re creating a home lab.
But hold on—what is a home lab?
Why Construct a Home Lab?
A home lab is your own little play space for the computer. It’s an area (most often a spare computer or laptop) that you can experiment with without destroying your home computer. You can play with servers, beta test software, host websites, and so on.
And surprise, surprise. Installing Docker in a home lab is the perfect starting point. It’s low-risk, high-reward, and extremely convenient if you’re technically inclined.
And now that you understand the “why,” let’s discuss the “how.”
What You’ll Need to Start
Let’s gather the basics before we start.
- A computer: Anything with 4GB of RAM or higher will work. It doesn’t need to be top-of-the-line.
- An operating system: Linux (e.g., Ubuntu) is acceptable, but Windows and Mac will be acceptable as well.
- An internet connection: Docker involves downloading software from the internet.
Are those ready? Great. Let’s go through the configuration.
Step 1: Install Docker
This section is more complicated-sounding, but bear with me; it’s simpler than it seems.
If on Linux (or, e.g., Ubuntu):

For Windows or Mac, you just go to Docker’s official website and download the installer. Installation will guide you the rest of the way.
Boom! Docker is installed. You’re half way to deploying Docker in a home lab to host actual projects.
Step 2: Run Your First Container
Let’s check whether Docker is running.
Open your terminal and enter:

If you see a “Hello from Docker” message, you’re ready to go. That little demonstration just created a container—a tiny app run inside Docker. Not bad, eh?
You’ve just taken your first real step towards building your own digital lab.
Step 3: Organize Your Projects
Don’t go wild making containers helter-skelter before you get your act together. Make a folder for your Docker projects. Beneath that, make separate folders for each experiment or application you have to work on.
For example:

This makes life easier once you start adding in more bins. Besides, it makes your home setup appear more professional.
And discussing feeling like a pro…
Step 4: Let’s Use Docker Compose to Simplify Everything
It is fine to have one app executing, but how about apps that need more than one piece to run—like a database and a website? That is where Docker Compose is useful. It enables you to specify everything your app needs in one file.
Here’s a brief example:
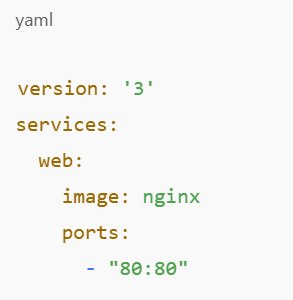
Save this as docker-compose.yml in your project directory and then run:
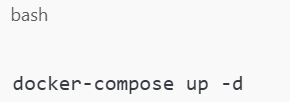
Just like that, you’re juggling several services like a boss. This is another important aspect of installing Docker in a home lab that feels contemporary and robust.
Step 5: Install a Dashboard using Portainer
Every now and then, terminal use gets stale. If you’re in the market for a graphical way of managing containers, Portainer is your friend. It offers you a clean web browser dashboard to manage it all.
Use the following command to start:
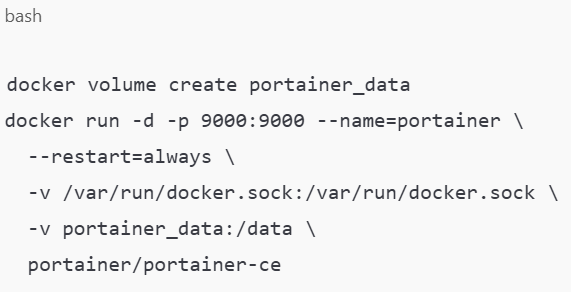
Then go to http://localhost:9000 and establish your admin account. You now have a command center for your entire lab. Aren’t you better off than writing in the dark?
Step 6: Keep Learning and Experimenting
At this stage, you know the fundamentals of containers, launching apps, and being organized. That’s a big deal. Don’t stop there.
Try to build your own website. Set up a Minecraft server. Play with an API. There’s no limit to what your own lab can do. And every time you do something new, you’re better at working with Docker in a home lab.
Need some inspiration? Look at GitHub or Docker Hub for pre-existing containers, which you can download and execute with a few lines.
Thus, Why Does This Matter?
It’s easy to sit and read this and think, “Why bother?” That’s the thing—technology is everywhere these days. Having some concept of how to make the most of tools like Docker gives you an edge. If you’re looking at a career in tech, building your own business, or just looking to impress your mates, this is worth knowing.
And, come on—it’s fun. Who wouldn’t want to have their own lab where you get to break things and try to figure out how to fix them?
Final Thoughts
Installing Docker in a home lab is one of the best things you can do in order to learn about software, experiment with it, and gain practical skills. You don’t need fancy hardware or guru-level abilities: just an eager mind, a computer, and a willingness to experiment. Begin with the basics. Build on them. And before long, you’ll have your own mighty playground for learning and making things, right in your own home.